


Welcome, fair traveler! Greetings and Salutations! Pull up a virtual chair and sit a spell. Listen to me wax eloquent on such diverse topics as tables and gaming and why I should be Emperor Of The Known Universe.
I'll start this blog with a description of my gaming environment. My game room is not the biggest room in the house (I'll have to wait for the kids to move out first before I can grab the "playroom") but it's certainly bigger than any game room I've ever had before. In point of fact, I've never had a game room before.
When we moved into this house in 2006, I knew my dream of my own room had come true, but what good is a game room without a game table to play on? I really didn't want to just stick some folding banquet tables in there, with some plywood on top. And I didn't want a ping-pong table either. I wanted something nice, a really nice piece of furniture that just happened to be a table. And I wanted it to be store-able, able to be folded up and put away or taken with me in a car.
So I did a little designing and I had my Dad, who is much more experienced in woodworking, construct a table. The essential design is mine, but the details and the nuts and bolts (as a figure of speech) are his. Hey, I'm an idea man, what can I say? I should add that I did the staining; he did the woodwork construction but I finished it off.
My Dad is no "gamer" by any stretch of the imagination. He really could not understand why I wanted it the way I wanted: the height, the legs not coming up to the edges, the purpose.... His idea of gaming is playing cards or doing puzzles. Even now I don't think he really gets it, and if he does then he doesn't approve. Different generation.
Now for some pics. I'll put the text above the applicable picture; it's easier to write something and then insert the photo. Click on the picture for a larger image.
First up: my game room, in most of its glory. That's my painting table in the far left corner. I have two more bookshelves against the left (hidden) wall, plus a closet filled with unpainted miniatures.
 Anyway, my table is 4' x 6'. It's divided into 3 top sections, each section being 2' x 4'. The kicker is, the sections are removable. The tops have parallel lips that sit inside the frame on top of the legs. Each lip has two holes per side through which I insert metal pins to secure the table top to the frame.

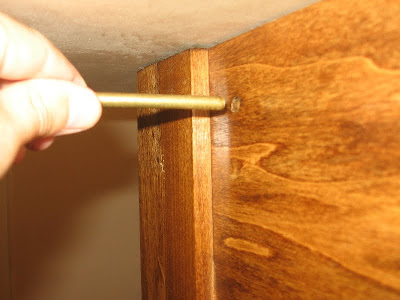
That way you can push down on the edge of the table top and it won't pivot up or flip. It's pretty sturdy, but I haven't tried sitting on it or anything. Certainly it holds up under a 6'2" man (not me) leaning on it reaching over to move his army. It's difficult to see in the pictures above, but the frame is recessed under the edge of the table top by approximately 6", so you won't kick the legs as you move around the table, and you can sit in a chair and the legs are more out of the way than if they were right at the corners of the table.
The cool thing is, when you remove the pins, the table top comes loose.

Next, you lift each section off and stand them up against the wall out of the way.
 Having removed the table top, what you have left is the legs and the frame.
 Now, in order to either store or transport the table, you simply remove the middle extensions. These are attached by... by... well, I don't know exactly what they're called. They're "bracket clasps," for lack of a better description. Here's a picture.
 After you unlatch the clasps, the middle extensions lift out, thusly:
 This then allows the legs to fold up almost flat (one folds flatter than the other, gotta be a little careful with that when transporting them). This picture doesn't show the legs fully folded, just a little bit for demonstration purposes!
 Now I can put it in the trunk of my car (as long as I fold the back seats down) or stand it up in my closet. AND, if I don't want to store it I can still use it in a smaller capacity! Simply attach the two halves of the frame together and you have the basis for a 4' x 4' table.
 The two halves of the table top that are the outer halves in full mode, now become a nice square table for smaller, perhaps skirmish-level, games. And it takes up much less room.
 So there you have it, my gaming table. I actually have another 2' x 4' section from the original board, but have not figured out a way to extend the frame without really weakening the structure. One of these days I'll pester my Dad to work it up for me, then I'll be 4' x 8', ready for my kids to move out! Hoody-hoo!
The best thing, since the labor was free, is that it only cost me materials. Back in February 2007, it was only $168 plus state sales tax, totalling roughly $180. Not bad for an "heirloom" piece of furniture, as my Dad calls it.
Thanks for reading. Please remember me when you go to vote for Emperor Of The Known Universe. And keep checking back; my next subject will be: philosophy! (...and how it relates to painting miniatures....) Oh and pictures of miniatures. Pretty pictures.
So there you have it, my gaming table. I actually have another 2' x 4' section from the original board, but have not figured out a way to extend the frame without really weakening the structure. One of these days I'll pester my Dad to work it up for me, then I'll be 4' x 8', ready for my kids to move out! Hoody-hoo!
The best thing, since the labor was free, is that it only cost me materials. Back in February 2007, it was only $168 plus state sales tax, totalling roughly $180. Not bad for an "heirloom" piece of furniture, as my Dad calls it.
Thanks for reading. Please remember me when you go to vote for Emperor Of The Known Universe. And keep checking back; my next subject will be: philosophy! (...and how it relates to painting miniatures....) Oh and pictures of miniatures. Pretty pictures.
 That's my painting table in the far left corner. I have two more bookshelves against the left (hidden) wall, plus a closet filled with unpainted miniatures.


 Having removed the table top, what you have left is the legs and the frame.
 Now, in order to either store or transport the table, you simply remove the middle extensions. These are attached by... by... well, I don't know exactly what they're called. They're "bracket clasps," for lack of a better description. Here's a picture.
 After you unlatch the clasps, the middle extensions lift out, thusly:
 This then allows the legs to fold up almost flat (one folds flatter than the other, gotta be a little careful with that when transporting them). This picture doesn't show the legs fully folded, just a little bit for demonstration purposes!
 Now I can put it in the trunk of my car (as long as I fold the back seats down) or stand it up in my closet. AND, if I don't want to store it I can still use it in a smaller capacity! Simply attach the two halves of the frame together and you have the basis for a 4' x 4' table.
 The two halves of the table top that are the outer halves in full mode, now become a nice square table for smaller, perhaps skirmish-level, games. And it takes up much less room.
 So there you have it, my gaming table. I actually have another 2' x 4' section from the original board, but have not figured out a way to extend the frame without really weakening the structure. One of these days I'll pester my Dad to work it up for me, then I'll be 4' x 8', ready for my kids to move out! Hoody-hoo!
The best thing, since the labor was free, is that it only cost me materials. Back in February 2007, it was only $168 plus state sales tax, totalling roughly $180. Not bad for an "heirloom" piece of furniture, as my Dad calls it.
Thanks for reading. Please remember me when you go to vote for Emperor Of The Known Universe. And keep checking back; my next subject will be: philosophy! (...and how it relates to painting miniatures....) Oh and pictures of miniatures. Pretty pictures.
So there you have it, my gaming table. I actually have another 2' x 4' section from the original board, but have not figured out a way to extend the frame without really weakening the structure. One of these days I'll pester my Dad to work it up for me, then I'll be 4' x 8', ready for my kids to move out! Hoody-hoo!
The best thing, since the labor was free, is that it only cost me materials. Back in February 2007, it was only $168 plus state sales tax, totalling roughly $180. Not bad for an "heirloom" piece of furniture, as my Dad calls it.
Thanks for reading. Please remember me when you go to vote for Emperor Of The Known Universe. And keep checking back; my next subject will be: philosophy! (...and how it relates to painting miniatures....) Oh and pictures of miniatures. Pretty pictures.


A good design, well executed, Is certain to be copied. Will be back to see what goes on top.
ReplyDeleteDouglas
A very nice article about your table and the making of it . . . and a very nice table it appears to be too, sir.
ReplyDeleteAs for the extension to 4x8', add legs to the underpart so that you'll have two more legs to your table.
-- Jeff