Saturday, August 6, 2011

41. The Quick and the Dead...Quickly

Following on from my last post, regarding my success with "dipping" my Arabs, I mentioned that I was going for a change of pace and would try dipping some 28mm Zombies.

Here are the final results.
"Huurrrr," shamble, shamble, shuffle, "Braaiins."
I did 25 Zombies from Victory Force miniatures in 7 hours!  For me, that's an all-time painting speed record.  Granted, all I did was a very simple one-color coat, then dipped, then drybrushed some highlights back on.  But even so, it was extremely fast; faster even than the Arabs (10 hours for 20 figures).

The preparation time was relatively minimal:  some filing was necessary but not extreme.  The most difficult part was getting the feet tab to fit into the slot on the base:  they required quite a bit of hard filing to get them narrow enough.
And as I mentioned last post, while I don't really like zombies, these are nice sculpts.  They are fairly benign insofar as the "that's disgusting" factor is concerned, and really just look like ordinary people who ended up on the wrong side of the zombie apocalypse.  There are also a couple of famous persons who have been zombified (you can see them in the pictures below).

Just click on all photos to enlarge them, assuming you can stand to look that closely at rotting walking human beings.

The following pictures show the progression of painting, starting with the flat single coat before dipping.  All I did was "stay within the lines," and even with the many different colors used it was still pretty fast.
Zombies 1 - 5.  You may have had Names in Life, but now you're just a Number....
Zombies 6 - 10
Zombies 11 - 15
Zombies 16 - 20
Zombie 21 - 25.  The lovey Ladies.
These next pictures show the final results after dipping, highlighting and finishing the bases.  One crucial difference between these dips and the Arab dips is that I used the Classic Black Minwax water-based wood stain for the dipping (and NOT the Coffee color Minwax water-based wood stain which I used on the Arabs).  (I have a more in-depth explanation of that process a couple of posts back).  I felt the black was more in keeping with urban undead than a brown would be.
Zombies 1 - 5
Zombies 6 - 10.  The Famous Zombies:  Jughead, Hitler, Jim Henson (that's a Kermit the Frog on his shirt, hand-painted), and either Elvis or Evel Knievel; and some not-famous lady to make it 5 figures).
A closer look at the three big famous-ies:  Hitler (I realized his uniform's color is probably not historically accurate, but I felt the need for artistic license:  he's a frikkin zombie, for crying out loud); Jim Henson, creator of the Muppets and Kermit the Frog; and either Elvis Presley or Evel Knievel the daredevil motorcycle stuntman).  I don't really know if Victory Force intended these guys to be who they are, but that's who they looked like to me, so that's how I painted 'em.
Zombies 11 - 15.  As I was painting this group, I realized I had unintentionally painted the second-from-left zombie as Captain Jean-Luc Picard from Star Trek:  The Next Generation.  His shirt was originally a plain maroon, but when I realized what I had done, I added the black stripes on his shoulders to match the TV uniform.  The only trouble is the figure is quite obviously wearing tennis shoes, so maybe he is a Trekkie convention-goer.
Zombies 16 - 20
Zombies 21 - 25.  The Ladies of Zombie.
The square shapes on the bases are pieces of masking tape.  I had to cover the holes on either side of the feet where the miniature's tab fit into the slotta base, and I had originally intended to use my usual technique of gluing sand on the base to cover those pieces of tape.  But after thinking about it, I didn't feel green grass was entirely appropriate for the walking dead, so I painted the bases a "sidewalk grey" and I think the random squares help add to that perception.

Now the next thing I need to do is paint some Survivors.  They will necessarily require a bit more personal attention than the hordes of shambling undead, so my dipping days are at a (temporary) end.  Except for the fact that I want to go back to my Arabs and knock out some more squads for The Sword and the Flame; my French Foreign Legion is spoiling for a fight!  I am becoming addicted to getting units painted and ready for the table.  This is not a feeling to which I am accustomed....

My next big challenge is actually getting to be home long enough to paint something at all.  My job keeps me away for long periods, but it also allows me to buy new toys so I guess it's a marginally fair trade.

Thanks for reading!

Wednesday, July 20, 2011

40. My Dipping Results

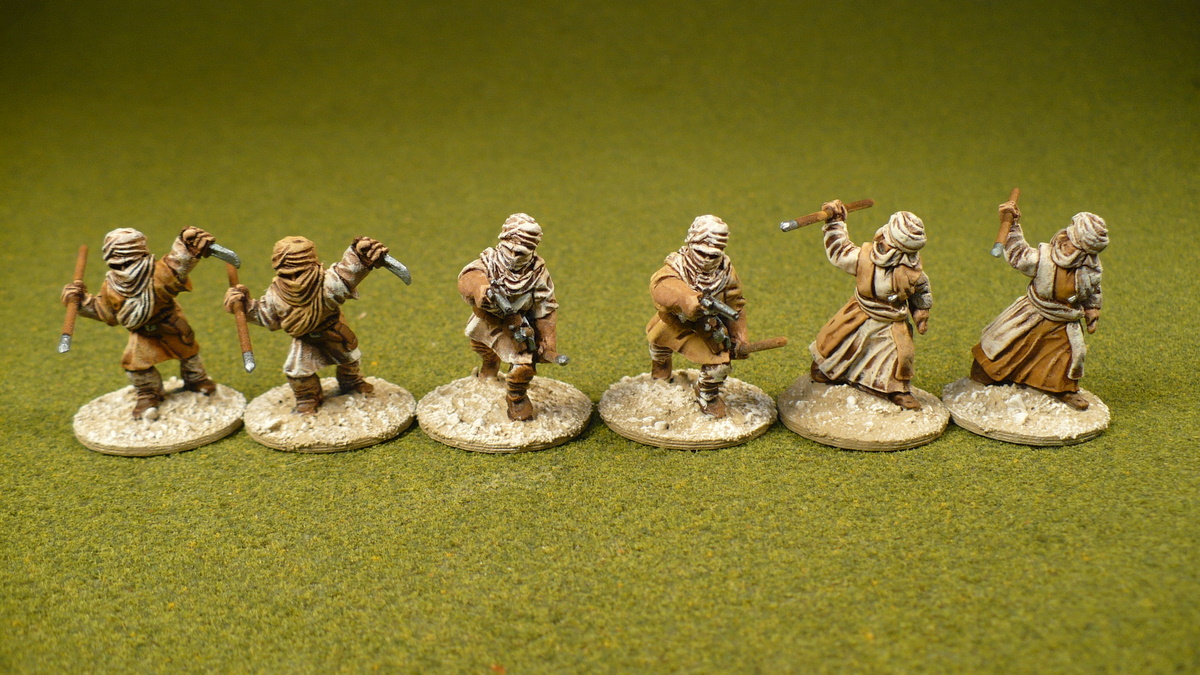
As I mentioned last post, I'm traveling a lot, so I haven't had much time to paint.  However, the dipping process is so fast that I now have two sets of 20-man Arab units finished!  The hardest thing for me now is finding time to take pictures and get a blog post written.

So here are my Arabs.  They are Old Glory, from their Sons of the Desert range.  All pictures are clickable.
SOD-06 Arabs Attacking with Spears


SOD-05 Arabs Attacking with Swords
Each pack contains 30 figures in 10 poses.  To construct a 20-man unit, I took two of each pose to have the maximum figure variety.  I then painted parallel figures in "opposing" colors; that is to say, if the body was dark brown with light sleeves on one, I painted the second figure with a light body and dark sleeves.  I used the same limited color palette on all of them, primarily two colors of brown, with an occasional third just for variety.  I did all this "in general," and felt justified in varying as I wanted.

For the unit leader, I gave him a red turban/headdress to help single him out on the table.  For the unit second-in-command, I painted some part of him in a light purple/lavender color; nothing too bright, just enough to help him stand out a little.


For the spearmen I had to create the spears.  I did not buy the pack of spears from Old Glory because I had read about making them yourself -- more inexpensively.  Naturally, I had to buy my item twice to get the effect I wanted, but it still ended up being cheaper.  I first used 20 ga. florist wire but this was a trifle too small in diameter and would bend.  So I next used 18 ga. florist wire and it worked a treat (as my British friends say).  I snipped the wire at around 1.25" long, and tried to give the "pointy end" a pointy end.  I had read where some people would take a ball-peen hammer and give the spear tip a hard hit, thereby producing a flattened spear blade.  However, and oddly enough, this florist wire was very hard, and would not flatten easily.  So I contented myself with making the cuts at an angle as much as possible, and the end is pointy enough to draw blood from my finger.  If you look closely at the back end of the spear, it's pretty pointy too, but paint draws the eye and makes it all o.k.  For the end result, I think they look fine.

When I came to the unit with swords, I ran into a problem.  The metal Old Glory uses for these figures is very soft, and many of the swords did not survive the bag.  Most of them were bent, and several were broken off.  Naturally they broke at the hilt, so simply supergluing them back in place was not an option.  I ended up making a couple of new swords out of the same metal rod I used to make the spears.  Of course this meant that the swords are not flat, in fact they're more a sort of club, but the effect I wanted was achieved:  from a distance, everyone has a sword.  I also was not able to keep to my standard of "two men of each pose" as so many of the swords were broken, and I did not want to take the extra time to mend them.  Instead I went with as many figures as possible with unbroken swords, then fixed the fewest number I needed to.  This led to three-of-a-pose in two cases, and I also ended up repairing swords after this as well.


Nevertheless, dipping -- and painting with the mindset of dipping -- is remarkably fast.  I just keep telling myself that these are not my pride-of-place miniatures, so it's O.K. to be in a hurry.  'Gotta keep reminding myself of that fact.  I think they look pretty darn good, if I do say so myself.  For the two units, each group of 20 has taken roughly 10 hours of actual painting time, including the bases.  That's about 30 minutes per figure.  This does not include the prep time, though, but I don't think that took me more than 2 hours at the most per group of 20.  I don't usually keep track of prep time, but I do track my painting time, so that's the only real comparison I can make with my previous painting time and style.  For me, this is extremely fast.  Your mileage may vary.

I also painted these two guys lying down from the swords package.  I don't really plan to use them, as I consider "lying down" figures about the most useless figures possible.  "Here, let me advance my fast-moving, Arabs charging with swords into your flank.  But just ignore these two guys, they're having a little lie down, got a headache don'cha know."  I mean, I can appreciate them for a more diorama feel, but how am I supposed to attack with guys on their stomachs?  I know an army travels on its stomach, but they didn't mean it literally!  But, I wanted to go ahead and paint them while I as at it, as I likely won't be back around to that package of figures ever again.  Maybe if they'd been shooting, kinda like snipers or something, I could find a use for them, but as it is, well....  And just how do they fit in with the "swordsmen" when all they have is a knife and a rifle?  Stop thinking about it, stop thinking about it.
"Do you see anything?"  "No, I don't see anything, do you see anything?"  "No, I don't see anything, do you see anything?"  "No, I don't see anything, do you see anything?"
Glamour shot of my Arabs, attacking over some sand dunes I attempted to make recently.  This is the first chance I've had to photograph the hills.  I'm not totally happy with how the dunes turned out.
Next up, I'm taking a quick detour down Zombie Lane (sorry, no picutures yet).  My bird-like attention span was saturated with Arabs, and I want to try out the dipping technique on something else.  I had previously bought 50 zombies from Victory Force when they ran their "50 Zombies for $50" special (which they do from time to time; keep watching as it's a really good bargain).

Now, normally I'm not a huge fan of zombies.  How can you tell someone that their lovingly painted, intricately detailed figure of an undead, intestine-trailing, limbless rotting human being "looks good"?  I appreciate the zombie genre, but I don't live for it (pun intended).

However, I have to say these zombies have a surprising amount of personality to them.  They are a nice selection of normal people who have had the utter misfortune to be turned into the walking dead (and I do mean walking, ZOMBIES DO NOT RUN; sorry, got sidetracked there), with a few recognizable historical/fictional persons thrown in as well.  More on that aspect next post.

I'm currently prepping 25 zombies for priming, filing down their mold and flash lines.  The metal Victory Force uses is much harder than Old Glory, and shinier too for what that's worth.  The figures are reasonably clean to begin with, but because the metal is harder it takes just a little longer to get that mold line removed.  (And I WILL remove all mold lines, I don't care if they are ugly, rotting, limbless, intestine-trailing figures, I will not paint a figure with mold lines showing.)  But that's fairly easy; the hardest part was removing enough of the "foot tab" for the figure to be able to fit into the slot on the plastic base (included in the order, BTW).  However, before I last left home, I was able to get all 25 prepped and glued in place.  When next I'm home, I will need to fill the gaps left between the foot tab and the edges of the slot, and then they'll be ready for spray priming.

I hope to use a simple color palette and painting technique on them, as well, to speed them up as much as possible.  I plan on using more modern day colors:  blue jeans, brighter shirts, etc, and then a very pale/almost dead white skin tone, and then a dip in the Classic Black stain instead of the brown.  But we shall see, as it's all subject to change after the first one gets it's bath.

Thanks for reading!

Tuesday, July 5, 2011

39. My Nerve...Restored

Good news, everyone!  I no longer consider myself a painting coward.

It came about like this:  After my failure at the tree, er, sorry, my failure to man up enough to "dip" my figures, I was faced with the option of what to do.

Because the whole point of dipping is to save time and money (but mainly time), I decided to throw money at the problem.  I went right out and bought another can of Minwax's Water-Based Wood Stain, and this time I very carefully considered the color samples in the store.  Here are a couple of pictures I took with my phone, using ambient lighting.
You can see that the Classic Black has some brown in it (which is why I went with it the first time); the American Walnut is less dark and more brown, and the Coffee is lighter still.  I opted for Coffee.

Here are the results of my first attempts.
After washing in Coffee stain, no highlighting.
I was afraid that it was still too dark.  I began to wonder if there was something even lighter brown than Coffee.
Left:  washed with Classic Black stain; Right;  washed with Coffee stain.  You can really see the difference in colors this way.
However, before I spent another $11 + change, I decided to try the Future Magic Wash.

I took the darkest brown paint I have, and liberally added it to the Magic Wash.  I then washed this mixture on the two figures on the right (picture below).  The two on the left are washed with Coffee stain.
Left:  Dipped in Coffee stain; Right:  washed with Magic Wash.
I added what I felt was a sufficient quantity of paint, but it barely even stained the figures, as you can see.  Apparently I need to add a lot more paint.

So I got to thinking:  the point of using either Polyshades or Future is to both wash and seal the figure in a protective clear-coat layer all in one step.  That is part of the time-saving feature.  However, I don't like Polyshades and the Future didn't work for me, so any time advantages I might have gained I would have to give up.

I realized that I am less interested in the time-saving aspect than I originally thought.  I still want a good-looking figure, but I could just as easily have taken my brown paint and washed the figures instead of diluting it in the Magic Wash.  I still don't like non-water-based agents, which is a shame because you can get a pint of Minwax Polyshades for around $7 which is more than enough to cover all the minis I have; instead I had to buy a quart (because the color is custom mixed) and it cost me around $11.  So now I have two quarts of two different brown stains, plus a bottle of Future floor polish (mostly unused) which originally cost me around $5.  In other words, I've spent roughly $27 plus tax, and for $30 I could have had one of The Army Painter's Quickshades (although, again, they're non-water-based and only about a pint in size).

But, y'know, sometimes I enjoy the discovery process.  And I like to be reminded that more often than not, time-saving shortcuts are not.

Therefore I finally committed to the Coffee stain, and through trial and error on the amount of stain-on-brush to use I got the following results.
Washed with Coffee stain.
In the end, I ended up going back over the figures with a quick dry-brushed highlight, then spraying a clear-coat protectant like I do for all my normal painting.
Simple drybrushed highlight over the wash.
I'll have to double-check my records when I get home, but these twenty men took me (I think) about 10 hours start to finish (that is, from first paint application to finishing the bases; it does not include filing the metal).
The two on the right are the same two that I earlier Magic Washed.
That works out to 1/2 an hour per figure, which for me is pretty darn fast.  I expect it will go even faster on the next group, and the next, etc.  Unfortunately, with 6-8 more groups of twenty to go, and the ability to paint only 10 days out of the month (and spread out, not ten in a row), it will still take me forever to finish....

...sigh...

Still, I persevere!

Thanks for reading.  Here are some pictures of the first group of 20 men completely finished.  You can click them to enlarge them slightly.


Red turban for Leader, light purple/blue tassles for Second in Command.
Update:  It's taken me so long to even get around to posting this, I have almost finished my second group of 20 figures.  The good news is it's still averaging around 30 minutes per figure.  I had hoped to finish them before I had to leave for work again, but I wasn't able to.  Pictures will appear when I am next home!  I do think the dipping is a time-saver, but I might be slightly biased into believing it because I want to believe it.  But after this group, I am going to take a break from Arabs and "have a go" (as the English say) at some zombies.  I think the dipping will help with them as well.  Will report soon!

Monday, May 30, 2011

38. My Nerve Fails Me....

A while back, I shared with you the fact that I had bought a whole lotta Arab-type opponents for my French Foreign Legion (you'll have to scroll down to the bottom to see it).  I explained that in order to paint so many figures, I was going to "dip" them, or "magic wash" them, depending on which method I used.  I bought a bottle of Future Floor Care as well as a container of Minwax's Wood Stain.

Most of the information I've read about the Minwax dip method said to use their Polyshades (stain & polyurethane in one step) line.  Most recommended was their Tudor color, or Bombay, or lastly Antique Walnut.  However, I personally have an aversion to anything that can't be cleaned up with water.  It simply makes things far more difficult than I would like, so instead I bought a quart of Minwax's Water-Based Wood Stain, which can be tinted to almost any color at the store.  I chose to have it colored Classic Black, which, if you carefully compare the color samples, appears to have some brown in it.

Naturally, Minwax does not have the exact same colors in both of its lines of stain.  That would be too easy.  However, to the best of my ability, I compared the Tudor and the Classic Black samples, and to me they look very, very similar.  So I went with Classic Black, as I said.

I also have a bottle of Pledge Floor Care with Future shine.  I am given to understand that you can tint it any color you wish, using either acrylic paints or acrylic washes.  My plan was/is to tint it to a dark brown if necessary, something more "muddy" than the Classic Black if it turned out I didn't like that result.

My intention was to try one method, and if it was horrible, to then try the other method.
There were a few projects that I wanted to finish first, so I am only now getting around to trying this out.  I have painted up 10 Arabs (from Old Glory), in basic flat colors as my guinea pigs.  I have tried to be neat, but not unduly so.  I know that the dip will cover most seam lines, and will darken the whole miniature, so I used lighter colors overall.  I did no highlighting or shading at all; merely a one-step process of a few colors for variety.  Ten men took me about 1.5 hours to paint to what you see here.


I did take a few pictures of the process, so I could compare how dark they are before and after the dip.

And then...the moment of truth came.  I opened up the can of Classic Black.  And by golly, it's black, alright.  I tested a brush stroke or two on paper, then on a primed mini.  It's black, alright.

And then...I lost my nerve.  I couldn't go through with it.  I'm second guessing myself, in that I should have gotten either the actual Polyshades, or a more brown Water-based stain.  I realized I haven't actually put that much time and effort into my ten men, but I still don't want to have to go back and repaint them.

I realize now that what I should have done was prep a true test figure or two, one that was never meant to be played with, so I could try both methods without fear.  Alas, I didn't think of it in time.  I told you, this is my first time with this method.

I'm away from my table for a few days, and when I get home I have to address this.  I either have to go buy another can of Minwax with a more brown color, or try the Classic Black, or try the Magic Wash method.

Indecision is a terrible thing.  I'm actually rather embarrassed about this, that I should be so concerned over the color of the wash.  But I want to do this right the first time, and not wish I had tried something else 100 figures later.

For those of you in the know, what color would you recommend?  In my mind's eye, I see a dark brown shading, representing the dirt of the desert.  As for the Magic Wash, do you color it with regular acrylic paint or do you prefer adding a wash to the mix?

Thanks for reading, thanks for your patience and thanks for any tips.

(And you know, there's a litte part of me that says, They look pretty good as is, just finish off the bases and they're tabletop ready....)

Sunday, May 22, 2011

37. Solo Tabletop Gaming Appreciation Month

Back in January, I reported how I played a solo game in recognition of International Solo Wargaming Day.  It was on 1-11-2011.  I said it then, and I'll repeat it now, 'cause it makes me chuckle:  "January 11, 2011 was International Solo Wargaming Day, a day when all solo wargamers could come together and game separately.  Wait, that doesn't sound right....  A day when all solo wargamers could play together, alone.  Ahhh, nevermind."

Anyway, I thought that was the end of it, until I came across this blog:  Solo Nexus.  He's promoting commitment to Solo Tabletop Gaming Appreciation Month, a whole month of solo gaming, occurring in November 2011, or 11-11 (and topping itself off, I guess, on 11-11-11).

In his own words:  "...make your pledge to yourself (and to us so we can keep you honest) by specifying to the best of your ability what momentous solo tabletop event you are planning to undertake this November!

Plan to use the whole month to finally paint those minis in the box on the shelf or try that rule set you bought last year or complete a fully-documented solo RPG adventure or design your own solo CCG with that software you've had your eye on or create the best after-action report of a solo battle ever or - well, you get the idea
."

 
I'm always one to jump behind a movement that doesn't really require much effort, and any solo gaming project is only as onerous as I make it, since only I am involved.  So I hereby pledge to do some momentous solo event in November.  Just exactly what it will be, I'm not sure yet, but as soon as I get a good idea of what I think I can finish, I'll report it here.

(I think it makes more sense for January 1, 2001 to be the big day, but unfortunately we missed that date.  Sure there are a lot of ones in 11-11-11, but are they ones or elevens?  Depends on whether we count in binary, I suppose....)

So pledge now, either here or at the mother site, Solo Nexus.

Good gaming!

36. A Review of "Pith Helmet 2"

Wellll, hello.  Yes, it's been a while since I posted anything, you're right.  Why?  Well, the usual reasons.  Work, mainly.  I got recalled to the job from which I was furloughed over two years ago, but it's a job that requires a LOT of traveling.  Traveling entails me being away from my painting table, my gaming table, and my figures needing paint; ergo, I have accomplished nothing about which to write.  So I have not posted anything at all.

I do realize that the header on my blog says, "With occasional outbursts from the Wisdom of Kelly, a Tao if you will.  Plus, as an added bonus, further proof as to why I should be Emperor Of The Known Universe," but I haven't really had anything important to say.  In which case the wisdom of my mother applies:  if you don't have anything nice (or important) to say, then don't say anything at all.  Which is all the more reason why I should be Emperor of the Known Universe, don't you think?

However, I did promise a while back that I would "have a more detailed description of the actual rules, and how I molded a story around a solo game."  That's something I can do without necessarily having access to my gaming station at home; I can write from my laptop, since the rules are a .pdf anyhow.

The rules in question are called "Pith Helmet 2," subtitled "1-Page Colonial Era Miniatures Rules" by Don Bailey.  I first encountered them in the pages of Historical Miniature Gamer magazine (now sadly defunct) issue #5, where Don had written up a review of his rules describing a solo game he had played as part of a larger campaign with other gamers across the world.  At the end of the article was an invitation to get a copy of the rules via email from Don, so I did.

They are front-and-back on a single 8-1/2" x 11" sheet of paper, with a couple of extra 1- to 2-page documents for add-ons, optional rules, and clarifications.  For many moons the only way to get ahold of the rules was to email Don and ask for them, but a short while ago that changed.  Stephen Luscombe, owner of the fantastic The British Empire website, announced that he was collating every set of Colonial-era rules he could find, with links to downloads and other sites; and that he would host orphaned rules as necessary.  I sent him Don's contact info, and now the rules et al can be downloaded directly from The British Empire site for free.  Don was very generous to allow it, and Stephen is very generous to provide the hosting service.  I definitely raise a glass in toast to both of you, gentlemen!

While you are there, you will be amazed at the sheer quantity of commerically-available and free rulesets solely on the subject of Colonialism.  It's a wonderful thing; we live in a true Golden Era.

I have played a few games of Pith Helmet, but my recent write-up was the largest I had played yet.  The crucial difference between Pith Helmet and most other rulesets is that Pith Helmet has a built-in solo capability, in that the system is highly Reaction driven.  Your opponent is run by the game system itself, which can make for unpredictable twists of fate.  This is both good and bad, depending on your point of view and whether or not you like more or less control of your troops during a battle.

A Brief Synopsis of the Rules

Of course, the rules can be run with two players as well; as in other Reaction-driven systems (such as Two Hour Wargames' offerings) some of the control exerted by the player over his miniatures is removed, making for a more "realistic" game.  Pith Helmet was my first experience with Reaction-driven rules, and it blew me away.  It actually made playing solo fun instead of work.  I have since sampled THW's Chain Reaction 3.0, ATZ, and several others; and while they are similar to Pith Helmet, there are still enough differences for me to have a little trouble understanding how the gameplay is supposed to go.  Not so with Pith Helmet.  The few questions I did have were quickly answered by Don via email, and the consistent tenor of the answers helped me to be able to solve my own future rules queries.

You will need 2d10, a few d6s, and a deck of normal playing cards.  There is no predetermined miniature scale in the rules.

Each game turn has 4 phases - Command, Action, Melee, and Morale.  The Action and Melee Phases may be interrupted by one or more Reaction Sequences.

Unit capabilites are divided into simple Unit Type / Nationalities:  British, German; Sikh, Gurkha, Japanese; U.S., Boer; Other European, Egyptian, Punjabis; Imperial Chinese, Native Levies; Zulu; Pathan; and Boxer, Dervish, Other Natives.  Each Unit Type is assigned an Initiative rating with an Officer, with an NCO, and with no leader; as well as  a Marksmanship rating with Firearms or Native Missiles.  The average unit size is 10 - 20 figures.

In the Command Phase, each side rolls a d100 for each unit/squad and compares the roll to the unit's Initiative.  This will result in 0 to 4 Action Points (AP) per unit per turn.  Better trained units with Officers are more likely to receive more AP than poorly trained units without a leader.  Use a d6 or another similar marker to show the AP for each unit.  Example:  The Tirailleurs Sénégalais in this picture have 1 AP remaining.

In the Action Phase, the sequence of actions is determined by a normal deck of playing cards.  This nicely randomizes which units can move.  Each side draws 1 card.  The higher value acts first (Face = 10, Ace = 11, Red beats Black, Redraw ties).  Repeat until both sides ‘pass’, or no AP left.

Face, Ace:  Hasty Orders.  Only 1 Unit may act.
Number:  Up to 1/2 of units may act.
Red:  Hasty Action.  Unit(s) may only expend 1 AP.
Black:  Unit(s) may expend up to all AP.

This elegantly represents the logistical problems of battlefield command and control.  Your general may be a on hill near the rear of the battle, and may not be able to communicate his desires to his troops very effectively.

Therefore, if you draw a Red Ace, only one unit on your side can act, and it can only expend 1 Action Point.  This represents a loss of communication, so the unit will probably just hunker down, or shoot.

However if you draw a Black Five, up to half of your units may expend all of their AP.  So you will be more able to enact that flanking movement.

Units can 'pass' their action, in effect saving AP for possible Reactions, or for charging into melee.

Each Action Point allows a unit to do ONE of the following:
* Move
* change formation
* mount or dismount
* load or unload wagon or boat
* Fire
* move up or down 1 building floor
* limber or unlimber gun
* Attempt to erect or take down ladder (roll d10 ≤ 7)
* Attempt to unjam machine gun (Maxim roll d10≤ 9, other: d10 ≤ 7). Natives must roll ≤ 5

The heart of the system is its Reaction Sequence:  Reactions may themselves trigger more reactions.  Triggering Reactions:  Any unit that has AP remaining temporarily interrupts the Action Phase with a Reaction whenever:
* The Unit is Fired Upon
* An Enemy Unit Moves to within 10 Inches of the Unit

You then roll on the Reaction Table, rolling a d100 vs the unit's Coolness level (which is the same as it's Initiative rating) to determine the unit's response.  Reactions range from no reaction to Firing to Retreating.  Each Reaction costs that unit 1 AP.  If a unit has no AP, it has a chance to become Shaken.  Because it is a Colonial-era set of rules, there are some simple unit formations allowed:  Open, Column, Line, Square, Mass, Towed or Pushed Artillery, road bonues, etc.  Each formation is able to move a set number of inches, sometimes modified by whether the unit is Imperial or Native.

A unit must stop if it comes within 10” & LOS of the enemy.  This prompts a Reaction check by the enemy.

Weapons fire is unit to unit, and is accomplished by designating the target unit in range and Line of Sight.  If the firing unit is greater than 10 figures, divide it into "fire groups" of less than or equal to 10 figures.  This makes computing the Probability of Hit (POH) easier.  Weapons are subdivided into simple types:  Spear, Bow, Pistol 10"; Cavalry Carbine 15"; Rifle 25"; Machine Gun 30"; Artillery 40" - 60".  The rules assume all members of a unit are armed the same.

POH is calculated by taking the unit's Markmanship rating + (5 x the number of firing figures) + any Modifiers.  It sound initially complicated, but it resolves itself very quickly and easily.

You then roll d100 vs POH and find the results on the To-Hit Table.  There are modifiers for targets in light cover, shaken, open formation, etc; as well as firing unit modifiers, such as if they are mounted, or in open formation, etc.; very standard, basic types of modifiers that will be familiar to all wargamers.

Casualties caused by the To-Hit Table range from 1 - 3, possibly including Officers or NCOs.  Casualties go to the Rally Zone.

In the Melee Phase, units must charge or be charged to engage in melee.  Any unit that has at least one action left after the Action Phase is over, is eligible to charge.  The order of charges is determined using the same card-draw method as the Action Phase.

A charging unit obeys all movement rules except it need not stop if within 10” of an enemy unit.  A charging unit must attempt to move at least one figure into base contact with the enemy. If it fails, it immediately becomes shaken.

Charge Movement Rates per AP Expended:  Infantry: 9” + d10”; Cavalry: 15” + d10”.

From this you can see that it is possible to charge from outside the 10" range (important because at 10" you prompt a Reaction check if you simply move), but if you are greatly outside that range you should make sure you have sufficient AP to get there in the event of a poor d10 roll.  However, it's not a given:  all charges prompt a Charge Reaction.  Any unit charged MUST test it's reaction. Roll d100 vs the unit’s Coolness Level and consult the Charge Reaction Table:  the results range from retreat shaken; fire and fall back; stand and fight; and fire, then stand and fight.

It is possible for the charged unit to fall back out of range of the charging unit, who may then charge again if it has sufficient AP.

After all charges/reactions are finished, resolve melees for units still in contact.  All figures in a unit fight regardless of actual base contact.  Each side draws a card and adds applicable modifiers to its value.  High total wins this round.  The difference in totals is the number of losing figures that drop out of melee.  If tied, one figure on each side drops out.  Figures that drop out of melee normally go to the rear of their unit and no longer participate.  They automatically reform with their unit after the melee.  However, in any round that the enemy drew a Red card, figures lost go to the Rally Zone instead.

When only one side has figures left in the melee that haven’t dropped out or gone to the Rally Zone, that side wins the melee.  The losing unit(s) retreat 3d10 inches in open formation from the point of contact and become Shaken.  For each inch it is unable to retreat, a unit loses one figure to the Rally Zone.  Any winning unit(s) immediately regroup into any allowed formation.  They may then expend an AP (if available) to advance 1d10”.  If they contact the enemy, roll for the enemy’s reaction to charge.  If neither side has figures left able to fight, the melee is a draw and both sides retreat 2d10” becoming shaken.

After all Melees have been completed, you begin the Morale Phase.  In the morale phase, players attempt to recover figures from the Rally Zone.  The Rally Zone is an off-table box (I used the bookshelf behind me in my game room) where casualties are kept until their ultimate fate is determined.  Draw one card for each figure and consult the Rally Zone Table.  Figures that die or rout are removed from the game.  Results include:  Heart:  Dies; Diamond:  Stays in Rally Zone to Captured to Dies (depending on the Nationality); Other card:  Return to Unit or Return to any leader (again, depending on the Nationality).

After all figures are accounted for, complete the Morale Check:  each shaken unit must check morale.  Roll d100 vs its Morale Level (M).  M = (1/2 Unit Initiative) + (2 X Number of figures remaining in unit).  The fewer the figures remaining in a unit, the more difficult it will be for the unit to remain in the game.  The results are either the unit returns to normal, or it retreats 2d10" and stays shaken.

The Shaken condition has effects throughout the game:  it halves Initiative and Coolness for all Command, Reaction, Charge Reaction and Morale checks.

A unit about to retreat off the table gets an extra “last ditch” morale check.  If it fails it is removed from the game (routed, and ran away).  This is done regardless of what phase the turn is currently in (i.e., Action, Melee, etc).

You then check to see if any victory conditions have been met.  If not, then reshuffle the deck and start a new turn.  Any AP that units may have remaining are now lost before proceeding to the next turn.

And that's the rules synopsis for Pith Helmet.  Not terribly brief but still shorter than the actual rules, so that's something....

Fictionalizing My Game

A Reaction-based game lends itself very well to role-playing, or at least adds a role-playing aspect to an otherwise dry miniatures game.  The first thing to ask, when a Reaction causes an unintended sequence of events, is:  Why did that unit do that?  Obviously they did it because the d100 roll told them to do it.  But at a deeper level, Why?  Obviously they did it because the Officer misread the situation; or because the NCO is actually a coward; or because the Natives didn't expect that kind of withering firepower from the Imperials; and so on.

That is what was so enjoyable for me in Death in the Jungle, coming up with explanations for why the troops were acting as they did.  I think (and I hope) you can see it when you read my story.  Now that you have an understanding of the sequence of gameplay, it should be quite apparent what was happening game-wise in the story.  When the Captain hesitated or waited, it was because the card draw wouldn't let me activate, or the Natives activated first.  Sometimes the reactions took the "plot" right out of my hands.

Shaken units are worrisome, because even with a high-I Officer leading them, when you halve it and roll poorly, they can still run away!  In Pith Helmet, there is no provision for a nearby un-shaken unit rallying a shaken unit; it would be easy enough to "house rule" it, but as it is the shaken unit stands or falls on its own merit.

I earnestly encourage you to give Pith Helmet a try.  It really is fun.

My next project using Pith Helmet will be with my "classic" French Foreign Legion fighting against North African Arabs, Berbers and Tauregs.  I have got them purchased, and have just begun the painting process.  I plan to use the "dip" method to speed my painting time, since I have 100-200 Arabs to paint.  I will chronicle as I am able.

Unfortunately, Pith Helmet does not directly address either the FFL or the North African tribesmen, which is why I had to use them in Death in the Jungle "as British," etc.  I will likely do the same thing next time, unless I can pester Don into creating a Nationality add-on!

Don Bailey can be reached at pouncing_tiger@mac.com
Stephen Luscombe can be reached at stephen@britishempire.co.uk

Thanks for reading, and I hope this was informative and helpful.